전 시간에는 Enhanced Input 을 이용하여 Input Action 들을 만들어 Input Mapping Context 에 집어 넣고 그것을 게임모드에 적용하는 것 까지 하였다. 그렇다면 오늘은 집ㅈ전 시간에는 Enhanced Input 을 이용하여 Input Action 들을 만들어 Input Mapping Context 에 집어 넣고 그것을 게임모드에 적용하는 것 까지 하였다. 그렇다면 오늘은 캐릭터를 움직이는 코드를 짜 보겠다.
원래는 편의상 이미 만들어진 코드인 AddMovementInput, AddControllerYawInput 그리고 AddControllerPitchInput 를 사용하려 하였다. 그러나 처음 만들 때에는 정확한 원리를 알고 어떻게 움직이는지 알아보는게 좋겠다 생각하여 Tick 을 이용해 움직이도록 만들어 보겠다. 그렇기에 Player Controller 에 새로 추가되는 내용이 생겼다.
#pragma once

#include "CoreMinimal.h"
#include "GameFramework/PlayerController.h"
#include "TstoryPlayerController.generated.h"

class UInputMappingContext;
class UInputAction;


UCLASS()
class TSTORYPROJECT_API ATstoryPlayerController : public APlayerController
{
	GENERATED_BODY()

public:
	ATstoryPlayerController();

	UPROPERTY(EditAnywhere, BlueprintReadWrite, Category = "Input")
	UInputMappingContext* InputMappingContext;
	UPROPERTY(EditAnywhere, BlueprintReadWrite, Category = "Input")
	UInputAction* MoveForwardAction; // 새로 추가된 함수
	UPROPERTY(EditAnywhere, BlueprintReadWrite, Category = "Input")
	UInputAction* MoveRightAction;	 // 새로 추가된 함수
	UPROPERTY(EditAnywhere, BlueprintReadWrite, Category = "Input")
	UInputAction* JumpAction;
	UPROPERTY(EditAnywhere, BlueprintReadWrite, Category = "Input")
	UInputAction* LookAction;
	UPROPERTY(EditAnywhere, BlueprintReadWrite, Category = "Input")
	UInputAction* SprintAction;

protected:
	virtual void BeginPlay() override;
};
원래는 AddMovementInput 을 사용한다면 이렇게 MoveForwardAction 과 MoveRighrtAction 으로 나눌 필요 없이 그냥 MoveAction 으로 나누면 된다. 그러나 우린 이 둘을 따로 만들기에 두개로 나누었다.
#include "TstoryPlayerController.h"
#include "EnhancedInputSubsystems.h"

ATstoryPlayerController::ATstoryPlayerController()
	: InputMappingContext(nullptr),
	MoveForwardAction(nullptr),
	MoveRightAction(nullptr),
	JumpAction(nullptr),
	LookAction(nullptr),
	SprintAction(nullptr)
{

}

void ATstoryPlayerController::BeginPlay()
{
	Super::BeginPlay();

	if (ULocalPlayer* LocalPlayer = GetLocalPlayer())
	{
		if (UEnhancedInputLocalPlayerSubsystem* Subsystem =
			LocalPlayer->GetSubsystem<UEnhancedInputLocalPlayerSubsystem>())
		{
			if (InputMappingContext)
			{
				Subsystem->AddMappingContext(InputMappingContext, 0);
			}
		}
	}

}
C++ 파일 또한 바뀐 내용에 대해 추가해주었다. MoveForwardAction 은 MoveAction 과는 다르게 Axis1D(float) 형식이며 MoveRightAction 은 FVector2D 형식이다. 만약 따라 만들때 IA 를 만들 경우 참고하길 바란다. IMC 에 매핑할 때에는 전에 포스팅한 내용과 똑같이 설정하면 된다. MoveFowardAction 은 W 와 S 를 사용하고 MoveRightAction 은 A 와 D 를 사용한다.
일단 매핑은 끝났으니 이제 캐릭터 C++ 로 돌아간다. 아래는 캐릭터 클래스의 헤더 파일이다. 주석에 달린 순서대로 설명하겠다.
#pragma once

#include "CoreMinimal.h"
#include "GameFramework/Character.h"
#include "TistoryCharacter.generated.h"

class USpringArmComponent;
class UCameraComponent;
struct FInputActionValue;

UCLASS()
class TSTORYPROJECT_API ATistoryCharacter : public ACharacter
{
	GENERATED_BODY()

public:
	ATistoryCharacter();

	UPROPERTY(VisibleAnywhere, BlueprintReadOnly, Category = "Camera");
	USpringArmComponent* SpringArmComp;
	UPROPERTY(VisibleAnywhere, BlueprintReadOnly, Category = "Camera");
	UCameraComponent* CameraComp;

protected:

	virtual void SetupPlayerInputComponent(class UInputComponent* PlayerInputComponent) override;

	UFUNCTION()
	void HandleMoveForwardInput(const FInputActionValue& value); // 1
	UFUNCTION()
	void HandleMoveRightInput(const FInputActionValue& value); // 2
	UFUNCTION()
	void StartJump(const FInputActionValue& value); // 3
	UFUNCTION()
	void StopJump(const FInputActionValue& value); // 4
	UFUNCTION()
	void Look(const FInputActionValue& value); // 5
	UFUNCTION()
	void StartSprint(const FInputActionValue& value); // 6
	UFUNCTION()
	void StopSprint(const FInputActionValue& value); // 7


protected:

	virtual void BeginPlay() override;
	virtual void Tick(float DeltaTime) override;


private:

	float NormalSpeed;
	float SprintSpeedMultiplier;
	float SprintSpeed;
	float MoveForwardInput;
	float RotationSpeed;
	float CurrentSpeed;
	FVector2D MoveRightInput;
	FRotator LookRotation;
	FRotator CameraRotation;
};
번호는 달지 않았지만 SetupPlayerInputComponent 란 우리가 매핑한 인풋 액션을 불러와 그 액션이 실행됨 을 알려주기 위한 컴포넌트이다. 또한 여기서 어떤 버튼이 어떤 함수를 실행시킬지 여부를 조절할 수 있다. 예를 들어 Controller 클래스에 존재하는 LookAction 에 해당하는 키를 입력할 때 위의 5번인 Look 함수를 호출하게 만들 수 있다는 의미이다.
1. HandleMoveForwardInput
이는 W, S (앞 뒤) 의 키를 입력 받으면 호출되는 함수이다. 이를 이용해 Tick 함수에서 캐릭터를 움직일 때 어느 방향으로 움직일 지 정해주는 역할이다.
2. HandleMoveRightInput
이는 A, D (왼쪽 오른쪽) 의 키를 입력 받으면 호출되는 함수이다. 이를 이용해 Tick 함수에서 캐릭터를 움직일 때 어느 방향으로 움직일 지 정해주는 역할이다. Foward 와 Right 는 서로 다른 함수를 이용해 움직이기에 이렇게 분리시킨다.
3,4. StartJump, StopJump
이는 Space (점프) 의 키를 입력 받으면 호출되는 함수이다. StopJump 와 구분되는 이유는 StartJump 가 시행되고 플레이어가 지면에 도착하기 전까지는 다시 시행되면 안되는 함수이기에 구분해서 사용해준다. Jump 과 StopJump 자체 함수를 이용할 것이기에 나중에 Jump 를 직접 구현하면 더 자세히 알아보겠다.
5. Look
이는 마우스 움직임을 입력받으면 호출되는 함수이다. 이 또한 X축과 Y축으로 나뉘어 있지만 입력받는 인수는 FVector2D 이기에 이 안에서 X 와 Y 를 나누어 사용하면 된다. 우리는 3인칭 캐릭터를 만들기에 좌 우 움직임에는 캐릭터가 회전해야 하나 위 아래 움직임에서는 캐릭터가 멈추어야한다. 이것을 고려해 만들어 보겠다.
6,7. StartSprint, StopSprint
이는 Shift (달리기키) 를 누르면 호출되는 함수이다. 플레이어가 달리기키를 누르면 평균 속도(NormalSpeed) 에 가중치(SprintSpeedMultiflier) 를 곱하여 주고 달리기키가 떼어지면 다시 평균 속도로 회귀하게 만들어 주면 된다.
이제 대충 헤더파일을 보았으니 Cpp 파일을 보도록 하자.
#include "TistoryCharacter.h"
#include "TstoryPlayerController.h"
#include "EnhancedInputComponent.h"
#include "Camera/CameraComponent.h"
#include "GameFramework/SpringArmComponent.h"
#include "GameFramework/CharacterMovementComponent.h"

ATistoryCharacter::ATistoryCharacter()
{
	PrimaryActorTick.bCanEverTick = true;

	SpringArmComp = CreateDefaultSubobject<USpringArmComponent>(TEXT("SpringArm"));
	SpringArmComp->SetupAttachment(RootComponent);
	SpringArmComp->TargetArmLength = 300.0F;
	SpringArmComp->bUsePawnControlRotation = true;

	CameraComp = CreateDefaultSubobject<UCameraComponent>(TEXT("Camera"));
	CameraComp->SetupAttachment(SpringArmComp, USpringArmComponent::SocketName);
	CameraComp->bUsePawnControlRotation = false;

	NormalSpeed = 600.0f;
	CurrentSpeed = NormalSpeed;
	SprintSpeedMultiplier = 1.7f;
	SprintSpeed = NormalSpeed * SprintSpeedMultiplier;
	MoveForwardInput = 0.0f;
	MoveRightInput = FVector2D::ZeroVector;
	LookRotation = FRotator::ZeroRotator;
	CameraRotation = FRotator::ZeroRotator;
	RotationSpeed = 1.0f;

	GetCharacterMovement()->bOrientRotationToMovement = false;
	GetCharacterMovement()->bUseControllerDesiredRotation = true;
	GetCharacterMovement()->MaxWalkSpeed = NormalSpeed;

}


void ATistoryCharacter::BeginPlay()
{
	Super::BeginPlay();

}


void ATistoryCharacter::SetupPlayerInputComponent(UInputComponent* PlayerInputComponent)
{
	Super::SetupPlayerInputComponent(PlayerInputComponent);

	if (UEnhancedInputComponent* EnhancedInput = Cast<UEnhancedInputComponent>(PlayerInputComponent))
	{
		if (ATstoryPlayerController* PlayerController = Cast<ATstoryPlayerController>(GetController()))
		{
			if (PlayerController->MoveForwardAction)
			{
				EnhancedInput->BindAction(
					PlayerController->MoveForwardAction,
					ETriggerEvent::Triggered,
					this,
					&ATistoryCharacter::HandleMoveForwardInput
				);
				EnhancedInput->BindAction(
					PlayerController->MoveForwardAction,
					ETriggerEvent::Completed,
					this,
					&ATistoryCharacter::HandleMoveForwardInput
				);
			}
			if (PlayerController->MoveRightAction)
			{
				EnhancedInput->BindAction(
					PlayerController->MoveRightAction,
					ETriggerEvent::Triggered,
					this,
					&ATistoryCharacter::HandleMoveRightInput
				);
				EnhancedInput->BindAction(
					PlayerController->MoveRightAction,
					ETriggerEvent::Completed,
					this,
					&ATistoryCharacter::HandleMoveRightInput
				);
			}
			if (PlayerController->JumpAction)
			{
				EnhancedInput->BindAction(
					PlayerController->JumpAction,
					ETriggerEvent::Triggered,
					this,
					&ATistoryCharacter::StartJump
				);
				EnhancedInput->BindAction(
					PlayerController->JumpAction,
					ETriggerEvent::Completed,
					this,
					&ATistoryCharacter::StartJump
				);
			}
			if (PlayerController->LookAction)
			{
				EnhancedInput->BindAction(
					PlayerController->LookAction,
					ETriggerEvent::Triggered,
					this,
					&ATistoryCharacter::Look
				);
				EnhancedInput->BindAction(
					PlayerController->LookAction,
					ETriggerEvent::Completed,
					this,
					&ATistoryCharacter::Look
				);
			}
			if (PlayerController->SprintAction)
			{
				EnhancedInput->BindAction(
					PlayerController->SprintAction,
					ETriggerEvent::Triggered,
					this,
					&ATistoryCharacter::StartSprint
				);

				EnhancedInput->BindAction(
					PlayerController->SprintAction,
					ETriggerEvent::Completed,
					this,
					&ATistoryCharacter::StopSprint
				);
			}
		}
	}
}

void ATistoryCharacter::Tick(float DeltaTime)
{
	Super::Tick(DeltaTime);
	if (Controller)
	{
		// 현재 위치 가져오기
		FVector CurrentLocation = GetActorLocation();

		// 앞뒤 이동
		if (MoveForwardInput != 0.0f)
		{
			// 로컬 좌표계의 이동 방향을 월드 좌표계로 변환
			FVector ForwardVector = GetActorForwardVector() * MoveForwardInput * CurrentSpeed * DeltaTime;
			CurrentLocation += ForwardVector;
		}

		// 좌우 이동
		if (MoveRightInput != FVector2D::ZeroVector)
		{
			// 로컬 좌표계의 이동 방향을 월드 좌표계로 변환
			FVector RightVector = GetActorRightVector() * MoveRightInput.Y * CurrentSpeed * DeltaTime;
			CurrentLocation += RightVector;
		}

		// 새로운 위치로 캐릭터 이동
		SetActorLocation(CurrentLocation, true); // 두 번째 인자는 스위핑 여부 (충돌 검사)
	}
}

void ATistoryCharacter::HandleMoveForwardInput(const FInputActionValue& value)
{
	if (!Controller) return;
	MoveForwardInput = value.Get<float>();
}
void ATistoryCharacter::HandleMoveRightInput(const FInputActionValue& value)
{
	if (!Controller) return;
	MoveRightInput = value.Get<FVector2D>();
}

void ATistoryCharacter::StartJump(const FInputActionValue& value)
{
	if (value.Get<bool>())
	{
		Jump();
	}
}

void ATistoryCharacter::StopJump(const FInputActionValue& value)
{
	if (!value.Get<bool>())
	{
		StopJumping();
	}
}

void ATistoryCharacter::Look(const FInputActionValue& value)
{
	FVector2D LookInput = value.Get<FVector2D>();

	if (APlayerController* PlayerController = Cast<APlayerController>(Controller))
	{
		float Yaw = LookInput.X * RotationSpeed;
		float Pitch = LookInput.Y * RotationSpeed;

		PlayerController->AddYawInput(Yaw);
		PlayerController->AddPitchInput(Pitch);

		FRotator CurrentRotation = SpringArmComp->GetRelativeRotation();
		float NewPitch = FMath::ClampAngle(CurrentRotation.Pitch + Pitch, -89.0f, 89.0f);
		SpringArmComp->SetRelativeRotation(FRotator(NewPitch, 0.0f, 0.0f));
	}
}

void ATistoryCharacter::StartSprint(const FInputActionValue& value)
{
	if (!Controller) return;
	CurrentSpeed = SprintSpeed;
}

void ATistoryCharacter::StopSprint(const FInputActionValue& value)
{
	if (!Controller) return;
	CurrentSpeed = NormalSpeed;
}
생성자를 살펴보면 헤더파일에 선언된 여러 변수들이 초기화 되는 모습을 볼 수 있다. 원한다면 UPROPERTY 로 언리얼 에디터 내부에서 변경이 가능하도록 설정할 수 있으나 나는 변경할 생각이 없기에 여기서 초기화 하도록 설정했다. 각각 변수들을 살펴보면
NormalSpeed = 플레이어 평균 속도
CurrentSpeed = 플레이어 현재 속도 (가속 비가속을 구분짓기 위해 만들었다)
SprintSpeedMultiplier = 플레이어 달리기 속도 가중치
SprintSpeed = 평균 속도 * 달리기 속도 가중치
MoveForwardInput = W, S 키 입력 값 (W 면 1.0f, S 면 -1.0f 이다)
MoveRightInput = A, D 키 입력 값 (A 면 1.0f, D 면 -1.0f 이다)
LookRotation = 마우스 입력 값
CameraRotation = 마우스 입력 값 을 받아 설정되는 변수
RotationSpeed = 입력 값에 따른 회전속도 가중치
로 보면 되겠다. MoveForwardInput 과 MoveRightInput 이 받는 형태가 다른데 이는 W, S 는 float 로 받을 수 있는 반면 A, D 처럼 Y 축을 움직여야 하는 경우 Axis2D(FVector2D) 형태로 받아야 하기 때문이다. 정확한 이유는 모르겠으나 실험을 통해 이렇게 결론이 나왔다.
다음은 SetupPlayerInputComponent 을 살펴보자. 첫번째 if 문에서 UEnhancedInputComponent 에 대한 정의를 한다. 여기서 Cast<UEnhancedInputComponent>(PlayerInputComponent) 를 볼 수 있는데 이는 플레이어의 인풋을 받아 EnhancedInput 변수에 저장한다는 의미이다. 그리고 그 다음 if 문에서는 우리가 만든 PlayerController 클래스를 가져와 Cast<APlayerController>(GetController()) 를 시행하는데 이는 플레이어의 컨트롤러가 존재할 경우 이를 가져와서 사용한다는 의미이다.
아래의 if문들은 가져온 PlayerController 에서 Action 들을 뽑아 만약 그 Action 이 존재하면 EnhancedInput 컴포넌트의 자체 함수 BindAction 에서 어떤 트리거에 어떤 함수를 시행할 지 정의하게 해준다.
예시로 아래 코드를 살펴보자.
if (PlayerController->MoveForwardAction)
{
	EnhancedInput->BindAction(
		PlayerController->MoveForwardAction,
		ETriggerEvent::Triggered,
		this,
		&ATistoryCharacter::HandleMoveForwardInput
	);
	EnhancedInput->BindAction(
		PlayerController->MoveForwardAction,
		ETriggerEvent::Completed,
		this,
		&ATistoryCharacter::HandleMoveForwardInput
	);
}
EnhancedInput 의 BindAction 함수를 사용하는데 매개변수가 총 4개이다. 처음부터 보자면
PlayerController->MoveForwardAction : PlayerController 에 존재하는 함수 MoveForwardAction 키 값을 의미한다.
ETriggerEvent::Triggered , ETriggerEvent::Completed : 키 값이 어떻게 되었는지 알려준다. Triggered 는 눌렀거나 눌러지고 있는 상태이고 Completed 는 입력이 끝난 상태를 의미한다.
this : 이 클래스를 의미한다. 더 자세히 보자면 이 클래스가 정의한 캐릭터라 볼 수 있겠다.
&ATistoryCharacter::HandleMoveForwardInput : 사용할 함수를 의미한다.
즉, 간단히 보자면 입력받은 키값을 찾고 그 키값에 대응하는 Action 과 상태, 사용할 함수에 대해 정의한다고 생각하면 된다. 이 아래의 함수들은 모두 비슷한 역할이다.
다음은 키값들을 입력받고 시행되는 함수들이다.
void ATistoryCharacter::HandleMoveForwardInput(const FInputActionValue& value)
{
	if (!Controller) return;
	MoveForwardInput = value.Get<float>();
}
void ATistoryCharacter::HandleMoveRightInput(const FInputActionValue& value)
{
	if (!Controller) return;
	MoveRightInput = value.Get<FVector2D>();
}

void ATistoryCharacter::StartJump(const FInputActionValue& value)
{
	if (value.Get<bool>())
	{
		Jump();
	}
}

void ATistoryCharacter::StopJump(const FInputActionValue& value)
{
	if (!value.Get<bool>())
	{
		StopJumping();
	}
}

void ATistoryCharacter::Look(const FInputActionValue& value)
{
	FVector2D LookInput = value.Get<FVector2D>();

	if (APlayerController* PlayerController = Cast<APlayerController>(Controller))
	{
		float Yaw = LookInput.X * RotationSpeed;
		float Pitch = LookInput.Y * RotationSpeed;

		PlayerController->AddYawInput(Yaw);
		PlayerController->AddPitchInput(Pitch);

		FRotator CurrentRotation = SpringArmComp->GetRelativeRotation();
		float NewPitch = FMath::ClampAngle(CurrentRotation.Pitch + Pitch, -89.0f, 89.0f);
		SpringArmComp->SetRelativeRotation(FRotator(NewPitch, 0.0f, 0.0f));
	}
}

void ATistoryCharacter::StartSprint(const FInputActionValue& value)
{
	if (!Controller) return;
	CurrentSpeed = SprintSpeed;
}

void ATistoryCharacter::StopSprint(const FInputActionValue& value)
{
	if (!Controller) return;
	CurrentSpeed = NormalSpeed;
}
자세히 보면 value.Get<>() 형태의 함수들을 많이 볼 수 있는데 이는 <> 안의 변수들의 값을 가져와 이 함수가 실행되어야 하는지를 감지하고 있다. 일종의 방어용 함수이다. 이 함수들이 데해 설명할 부분은 많이 없지만 이중 Look 에는 캐릭터 회전에 대해 나타나있다. 왜 Look은 Tick 함수에 넣지 않았냐면 이편이 더 쉽게 회전을 구현할 수 있기 때문이었다.
그럼 Look 함수를 살펴보자.
void ATistoryCharacter::Look(const FInputActionValue& value)
{
	FVector2D LookInput = value.Get<FVector2D>();

	if (APlayerController* PlayerController = Cast<APlayerController>(Controller))
	{
		float Yaw = LookInput.X * RotationSpeed;
		float Pitch = LookInput.Y * RotationSpeed;

		PlayerController->AddYawInput(Yaw);
		PlayerController->AddPitchInput(Pitch);

		FRotator CurrentRotation = SpringArmComp->GetRelativeRotation();
		float NewPitch = FMath::ClampAngle(CurrentRotation.Pitch + Pitch, -89.0f, 89.0f);
		SpringArmComp->SetRelativeRotation(FRotator(NewPitch, 0.0f, 0.0f));
	}
}
if 문 안에 APlayerController* PlayerController = Cast<APlayerController>(Controller) 가 있는데 이는 그냥 Controller 만 적어도 상관없다. 그러나 안전하게 PlayerController 라는 변수를 사용하여 아래의 코드를 짜는걸 선호해서 그렇게 만들어 놓았다. Yaw 는 전에 말했던 것처럼 Z 값, Pitch 는 X 값이다. 왜 Yaw 값에 Z가 들어있는지 궁금할 사람도 있겠는데 이는 아래의 사진을 보면 이해할 수 있을 것이다.
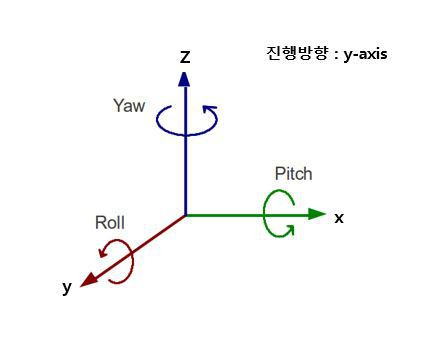
Z 축 즉, Yaw 가 회전하는 모습이 보통 게임에서 플레이어들이 캐릭터들을 둘러볼 때 사용하는 축이다. 그렇기에 우리가 마우스를 좌 우 즉, X 축으로 움직이면 Yaw 가 움직여 캐릭터를 회전시키는 것 이다.
X 축 즉, Pitch 는 위에서 아래로 회전 즉, 위 아래 움직임을 가지고 있는데 이는 마우스를 위 아래로 밀고 당길때 캐릭터의 모습을 생각하면 이해하기 쉽다. 결국 마우스의 X, Y 움직임을 조절해 사용자가 캐릭터를 움직이거나 관찰하게 쉽게 Z, X 움직임으로 변환시켜 준다 생각하면 된다.
이렇게 입력받은 값들을 AddYawInput, AddPitchInput 에 집어넣어 PlayerController 에 적용시킨뒤 계산한다. 아래의 FRotator CurrentRotation = SpringArmComp->GetRelativeRotation() 는 캐릭터의 몸통에 SpringArm 이 부착 되어있으므로 이에 대한 상대적인 회전값을 구하기 위해 사용하였다. 이유는 위 아래 카메라 무빙은 일정 각도를 넘으면 안되기 때문이다. 그렇기에 Pitch 값을 계산할 때에는 여러 제약을 걸어 놓는다. 아래의 두 문장도 Pitch 값이 90 에서 -90 을 넘지 않게 설계하기 위함이다.
이제 마지막으로 Tick 함수 안의 WASD 움직임에 대해 알아보자.
void ATistoryCharacter::Tick(float DeltaTime)
{
	Super::Tick(DeltaTime);
	if (Controller)
	{
		FVector CurrentLocation = GetActorLocation();

		if (MoveForwardInput != 0.0f)
		{
			FVector ForwardVector = GetActorForwardVector() * MoveForwardInput * CurrentSpeed * DeltaTime;
			CurrentLocation += ForwardVector;
		}

		if (MoveRightInput != FVector2D::ZeroVector)
		{
			FVector RightVector = GetActorRightVector() * MoveRightInput.Y * CurrentSpeed * DeltaTime;
			CurrentLocation += RightVector;
		}

		SetActorLocation(CurrentLocation, true); // 두 번째 인자는 스위핑 여부 (충돌 검사)
	}
}
처음에 GetActorLocation() 으로 현재 캐릭터의 위치를 가져온다. 여기에 스피드 값만큼의 속도 델타 타임에 곱한 만큼의 크기를 더해 이동을 구현하는 형식이다. 여기서 if 문의 차이를 두어 ForwardInput 인지 RightInput 인지 구별하게만 만들면 된다. GetActorForwardVector() 는 전후 이방에 사용되고 (보통 X축 을 기준으로 계산한다.) GetActorRightVector()는 좌우 이동 (보통 Y축 을 기준으로 계산한다.) 에 사용된다. 마지막 부분의 SetActorLocation(CurrentLocation, true) 은 더해진 이동값을 이용해 최종적으로 캐릭터가 있어야할 곳을 계산하여 적용시켜 준다. 여기서 두 번째 인자인 ture 는 충돌이 일어났는지 검사하는 인자이다.
이제 코드를 모두 짰다면 직접 실행시켜 보면 된다. 실행시키면 잘 된다! 하지만 아직 움직임이 뻣뻣하고 공중에서도 자율롭게 이동이 가능하다. 다음에는 더 연구해서 직접 점프를 만들어 보는 시간을 가지도록 하겠다.
'Unreal' 카테고리의 다른 글
| 데이터 테이블 - Unreal Engine (0) | 2025.02.11 |
|---|---|
| AnimationBlueprint 를 이용해 캐릭터의 움직임을 표현해보기 - Unreal Engine (0) | 2025.02.06 |
| C++로 3인칭 캐릭터 움직여보기 (Enhanced Input) (2) - Unreal Engine (1) | 2025.01.31 |
| C++로 3인칭 캐릭터 움직여보기 (1) - Unreal Engine (0) | 2025.01.27 |
| 문제들과 Float 값에 대한 고찰 - Unreal, C++ (0) | 2025.01.24 |